The ideal LinkedIn article image size is 1200 x 644 pixels with a 1.91:1 aspect ratio. If you want your article cover to look clean in the feed and avoid needless resizing work, start there every time.
The writing isn't usually the sticking point; the challenge often arises in the last ten minutes, when the article is ready, the image is almost done, and LinkedIn makes the whole thing feel oddly uncertain. One guide says one size, another says something else, and suddenly a simple publish task turns into design cleanup.
That confusion isn't minor. Conflicting recommendations like 744x400px, 1200x644px, and 600x322px lead to trial-and-error and can cause 20-30% more redesign iterations per post for solopreneurs according to Snappa's LinkedIn article image size guide. If you're publishing consistently, those repeated fixes pile up fast.
A better approach is to stop treating linkedin article image size as a one-off detail and build a repeatable workflow around it. If you're also publishing articles regularly, this guide on how to post articles on LinkedIn pairs well with the image process, because the publishing format and the visual setup work best when handled together.
Why Getting Your LinkedIn Article Image Right Matters
A strong article can still underperform if the image looks off in the feed. Readers usually see the visual before they decide whether the article is worth a click, and a stretched, blurry, or badly cropped image makes the post feel unfinished.
For solo operators, the primary cost is time. You open Canva, export something that looks fine, upload it, notice the crop is wrong on mobile, go back, move the headline, export again, then repeat. That loop breaks momentum and makes publishing feel heavier than it should.
The productivity cost is bigger than it looks
The wasted time isn't only in resizing. It's in all the small decisions you have to remake when you don't have a standard:
- Headline placement: You shift text around because you're not sure what the feed preview will show.
- Logo sizing: You make branding smaller than you'd like just to keep it from getting clipped.
- Re-exporting: You save multiple versions because you don't trust the first upload.
- Second-guessing: You spend energy checking appearance instead of moving on to your next post.
Practical rule: If you publish more than once in a while, image sizing shouldn't be a fresh decision every time. It should be a template.
Getting it right helps in two ways. First, your article looks more professional in the feed. Second, your production time drops because you stop reinventing the cover image for every new post.
The Official LinkedIn Article Image Dimensions
For day-to-day publishing, use 1200 x 644 pixels. That's the clearest working standard for linkedin article image size, and it matches the 1.91:1 aspect ratio LinkedIn displays well in article previews.
![]()
According to Typefully's LinkedIn post image size guide, the optimal dimensions for LinkedIn article feature images are 1200 x 644 pixels, and images below 1200px in width can see click-through rates drop by 30-50% due to blurriness. The same source also notes that keeping the file under 8MB helps avoid compression artifacts.
Why this size works in practice
This dimension is useful because it solves the most common publishing problems at once:
- It looks sharp: You avoid the fuzzy upscaling that happens with undersized exports.
- It fits the platform well: The aspect ratio matches how LinkedIn tends to preview article images.
- It keeps your workflow simple: You can build one master template and reuse it.
- It reduces approvals and rework: If you work with clients or collaborators, a standard spec cuts back on revision rounds.
If you've managed images for multiple platforms, you'll know every network handles crops a little differently. That's why it helps to keep a separate reference for other channels too. If you also update your business profiles, BeauPlat's guide to Google Business cover photo size is a practical companion resource.
The simplest repeatable standard
A reliable article image template should include these elements:
| Element | Recommendation |
|---|---|
| Canvas size | 1200 x 644 px |
| Aspect ratio | 1.91:1 |
| File size | Under 8MB |
| Export types | PNG or JPEG |
| Layout | Keep key content centered |
Use that as your default. For most solopreneurs, consistency beats endless tweaking.
Understanding How LinkedIn Crops Your Images
The image you upload isn't always the image people first see. LinkedIn can show one version in the article itself and another in the feed preview, which is where most publishing mistakes happen.
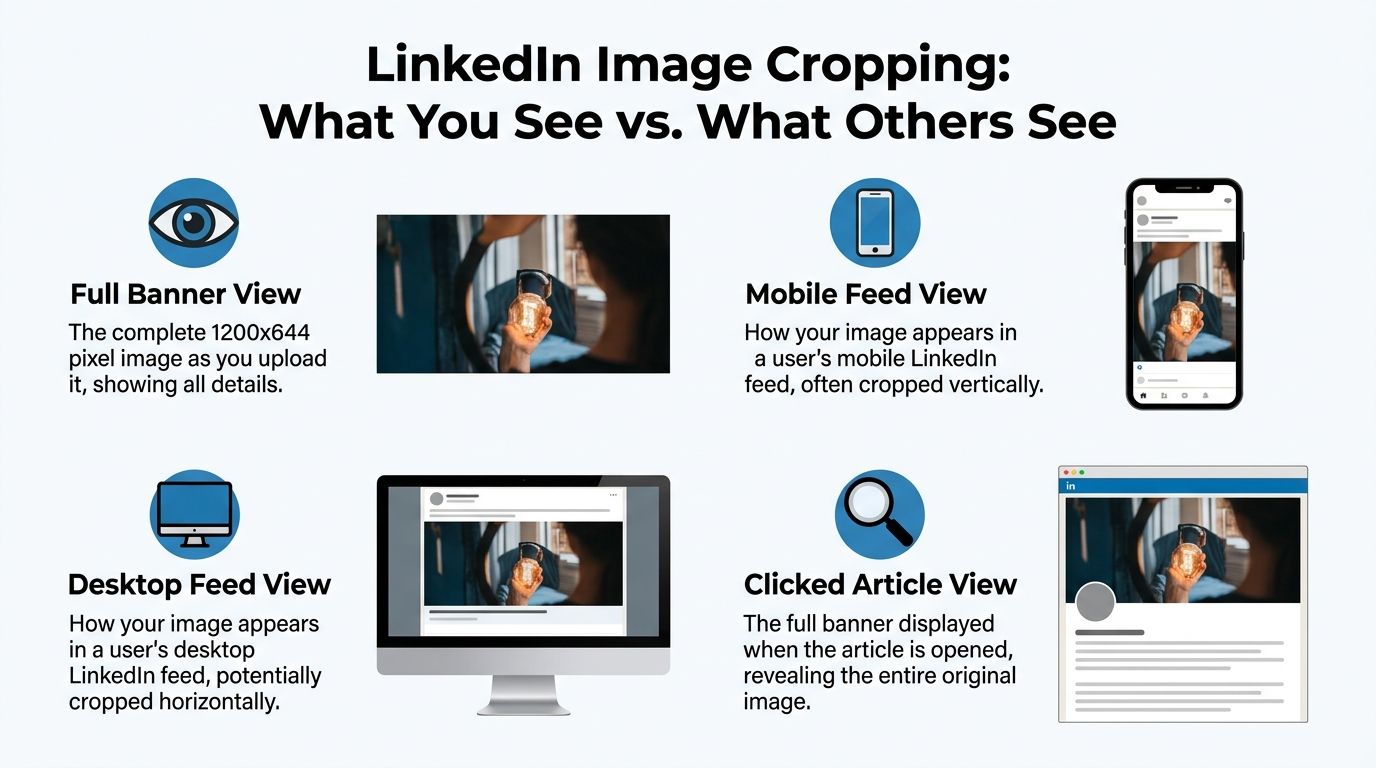
A larger header can still work, but the feed preview changes the way it appears. As noted in Analyzify's LinkedIn post sizes guide, a 1920×1080 header image can be used for a high-resolution article header, but LinkedIn's feed preview will auto-crop it to a 1.91:1 aspect ratio, around 1200×627. That means any important text, face, or logo needs to sit inside the central safe area.
What the safe area really means
Think of your image in two layers:
- Full canvas: Everything you upload.
- Feed-safe center: The area that still makes sense when LinkedIn trims the edges.
If you place a headline too close to the left or right side, it may disappear in preview. If a portrait is framed too tightly, LinkedIn may crop the face awkwardly. If your logo sits near an edge, it can end up partially hidden.
Keep the message understandable even if the outer edges vanish.
That one rule fixes most article-image issues.
A practical layout that holds up
When designing for crop resilience, use a simple composition:
- Primary subject in the middle: A face, product, or icon should sit centrally.
- Short headline near center: Avoid long lines pushed to the margins.
- Breathing room around edges: Leave empty space around important elements.
- Background details as support: Treat edge details as decorative, not essential.
A common mistake is designing the image like a website hero banner, with text split across the full width. That can look good in your editor and fail in LinkedIn's feed. Better to design for the preview first and let the full article view be the bonus.
When to use a larger header
If you want a polished, presentation-style article header, create a high-resolution version for the article itself. Just don't trust that full-width composition to survive in preview. In practice, many creators keep a high-res master and design the important content inside a feed-safe central block.
That small shift saves a surprising amount of cleanup later.
Recommended File Formats and Export Settings
Once the dimensions are right, the file itself becomes the next point of failure. A solid design can still look poor if you export it in the wrong format or save it too aggressively.
Choose PNG or JPEG based on the image
Use PNG when the image includes text, logos, icons, or flat graphic elements. PNG usually preserves edges more cleanly, which matters when your article cover includes a title overlay or branded shapes.
Use JPEG when the image is mostly photographic. If the design relies on gradients, natural lighting, or complex textures, JPEG often keeps file sizes more manageable while still looking good.
A quick rule of thumb:
- PNG fits graphic-heavy covers
- JPEG fits photo-heavy covers
- Either is fine if the result stays crisp and under the upload limit
Export settings that avoid common headaches
A simple export checklist keeps you out of trouble:
- Use sRGB color profile: That's the safest choice for web display and helps avoid color shifts.
- Keep the file under LinkedIn's limit: If the export feels bloated, compress slightly before upload.
- Review at actual size: Zooming way in can mislead you. Check how the image looks at a normal feed-like size.
- Name files clearly: Something like
article-cover-topic-v1.pngmakes future reuse easier.
If you want a broader refresher on compression, quality, and file prep for publishing, this guide on optimize images for web is worth bookmarking.
A clean export isn't about chasing perfect technical settings. It's about choosing the simplest format that preserves clarity without making upload harder.
Quick Workflows to Resize Images Perfectly
A good workflow saves more time than any one design trick. The goal isn't to learn every image tool on the market. It's to create one repeatable process that gets you to a publish-ready cover in minutes.
Canva workflow for speed
Canva is the fastest option for most solopreneurs because it removes setup friction.
Start with a custom design at 1200 x 644 px. Add a simple background, then create a safe central content block with guides or placeholder shapes. Put your headline, icon, or portrait inside that central zone and save the file as your master template.
A practical Canva setup looks like this:
- Create one base template for all article covers.
- Add brand colors, one font pairing, and a logo lockup.
- Leave a fixed center area for your title or visual.
- Duplicate the template for each new article instead of starting over.
Productivity now jumps. You're no longer designing. You're swapping content into a structure you've already tested.
Photoshop workflow for tighter control
Photoshop is useful when you want precise control over crops, retouching, or layered compositions.
Set up an artboard at 1200 x 644 px. Add guides that mark a central safe area, then build reusable smart object layers for background, headline, and brand mark. Save the file as a PSD template. For future articles, replace the smart objects and export.
Photoshop works especially well if you often:
- Composite multiple images
- Use masks and overlays
- Need exact typography control
- Prepare one design system across several platforms
The extra setup takes longer once, but it pays off when your brand visuals need to stay polished.
Free online tool workflow for one-off fixes
Sometimes you already have the image and just need to make it fit. In that case, a lightweight online resizer or cropper is enough.
Open the image, set the canvas or crop to 1.91:1, reposition the subject into the center, and export. This is best for quick repurposing, not for building a long-term system.
Use this route when:
- You need a fast adjustment
- You're republishing an existing blog header
- You don't need layered editing
- You want the simplest possible path to upload
A short walkthrough helps if you want to watch the process in action.
The template habit that saves the most time
The most impactful move isn't the tool. It's the reusable template.
Create three versions and keep them in one folder:
| Template | Best use |
|---|---|
| Text-led cover | Opinion posts, essays, thought leadership |
| Photo-led cover | Personal stories, founder articles, case reflections |
| Graphic-led cover | How-to content, frameworks, educational posts |
With those in place, your next article image becomes a light editing task instead of a fresh design project.
Writing Effective Alt Text for Accessibility
A polished image should still make sense to someone who can't see it. That's where alt text matters. It turns your article visual into something usable for people relying on screen readers, and it also forces you to clarify what the image is doing.
If you haven't built this habit yet, start simple. Postful's explainer on what is alt text is a useful reference if you want the broader accessibility context.
Use object, action, context
A practical formula is object, action, context.
Instead of writing something vague like "LinkedIn banner image," describe the image in plain language. Say what's in it, what's happening, and why it matters to the article.
Examples:
- Better: "Blue article cover with a centered headline about LinkedIn image sizing for solopreneurs."
- Better: "Illustration of a marketer resizing a banner image for a LinkedIn article."
- Weak: "Cover image"
- Weak: "LinkedIn article graphic"
Keep it descriptive, not stuffed
Good alt text isn't a place to cram keywords. It should help a real person understand the image quickly.
Use these checks before publishing:
- Be specific: Name the main subject clearly.
- Skip filler: You don't need to write "image of" unless it adds clarity.
- Match the article's purpose: Describe the part of the visual that supports the topic.
- Keep it natural: If it sounds awkward when read aloud, rewrite it.
Good alt text describes what matters, not every visual detail.
That standard keeps accessibility practical instead of feeling like extra admin.
Troubleshooting Common Image Problems
Even with a solid process, uploads can still go sideways. The fix usually isn't complicated once you know what caused the issue.
The image looks blurry
The most likely cause is a small source file or an over-compressed export. If you started with something narrower than your final canvas, LinkedIn may be showing an upscaled version that softens details.
Fix: Go back to the original file and rebuild the cover at the correct dimensions instead of stretching a smaller asset. If the text still looks soft, export again with lighter compression or switch from JPEG to PNG.
The subject or headline gets cut off
This usually comes from designing too close to the edges. The article header may look fine after upload, but the feed preview can trim the composition in a way that hides the important part.
Fix: Reposition the focal point into the center of the image. Shrink long headlines, reduce edge-to-edge layouts, and leave more empty space around the outer frame.
The file won't upload cleanly
In many cases, the file is too large or saved in an awkward format. Some exports also carry unnecessary metadata that bloats file size.
Fix: Re-export the image as a web-friendly PNG or JPEG and keep the file lean. If needed, duplicate the file, flatten layers, and save a fresh upload version rather than using your working document export.
The colors look off after upload
This often happens when the image wasn't prepared for web display. What looked right inside a design tool can shift online if the export settings aren't web-friendly.
Fix: Export in sRGB and preview the file in a browser before uploading. If your brand colors are sensitive, keep a small reference swatch in your design system and compare before publish.
The design feels cluttered in the feed
Some covers are technically correct but visually too busy once reduced. Small preview sizes don't give complex layouts much room to breathe.
Try this cleanup list:
- Cut headline length: Shorter text reads better in preview.
- Remove secondary elements: One clear message beats five decorative extras.
- Increase contrast: Make the headline or focal object easier to distinguish.
- Use one dominant subject: Too many competing elements weaken the visual hierarchy.
When an image isn't working, don't keep nudging tiny details around. Simplify it. That usually solves the problem faster than further tweaking.
Simplify Your Entire Workflow with Postful
Most of the frustration around linkedin article image size comes from repeated manual decisions. You choose dimensions, test crops, rewrite text overlays, export again, and then try to remember what worked last time. That process is manageable once. It's draining when it becomes part of every article.
The better route is to reduce how many of those decisions you make by hand. A tool that helps you reuse formats, keep content organized, and prepare visuals around a repeatable system removes a lot of the friction.
What an efficient system should do
For solo creators, the right setup should help with a few practical jobs:
- Turn rough ideas into post-ready content
- Keep reusable templates and formats close at hand
- Make scheduling part of the same workflow
- Support remixing content for different networks
- Cut the number of times you have to start from a blank canvas
Postful is built around that kind of publishing flow. If you want a closer look at how the product is evolving, the update on Postful v0.6.3 gives useful context.
Why this matters for busy operators
The biggest win isn't only faster design. It's preserving attention. When your article image process is repeatable, you spend more of your time on the article idea, the offer, and the follow-up content that brings in business.
That's the difference between posting occasionally and building a system you can sustain.
Quick Reference and Key Takeaways
When you're publishing regularly, you don't want to reread a full guide every time. A small reference table is more useful than scattered notes.
LinkedIn image size cheat sheet 2026
| Image Type | Dimensions (Pixels) | Aspect Ratio | Notes |
|---|---|---|---|
| LinkedIn article feature image | 1200 x 644 | 1.91:1 | Best working default for article covers |
| High-resolution article header | 1920 x 1080 | 16:9 | Can work for header display, but preview cropping needs care |
| Feed preview safe target | ~1200 x 627 | 1.91:1 | Keep critical content centered because preview may crop |
| Supporting banner preview | 600 x 322 | Roughly 1.91:1 | Useful reminder that smaller views reduce visible detail |
The points worth remembering
- Start with 1200 x 644 px: That's the most reliable default for linkedin article image size.
- Design for the center: If text, logos, or faces matter, keep them away from the edges.
- Export intentionally: PNG for text-heavy designs, JPEG for photo-heavy ones.
- Use templates, not memory: A saved system beats re-solving the same problem every week.
- Keep alt text part of publishing: Accessibility is easier when it's built into the routine.
A clean image process doesn't need to be complicated. It just needs to be consistent.
If you want to spend less time resizing visuals and more time publishing, Postful is worth trying. It helps solopreneurs turn rough ideas into postable content, organize repeatable workflows, and keep social publishing simple so you can turn your work into more business.