If you want your videos to perform well on Instagram, the best format is almost always an MP4 file using the H.264 codec and AAC audio. But the real secret is matching the aspect ratio to the placement. For Reels and Stories, you’ll want a 9:16 vertical ratio (1080×1920 pixels). For in-feed posts, a 4:5 vertical ratio (1080×1350 pixels) gets the best results.
Why Your Instagram Video Format Matters
Getting your Instagram video format right isn't just a technical detail—it’s one of the most important things you can do to boost your reach and engagement. The platform's algorithm gives a leg up to videos that are properly formatted for Reels, Stories, and the Feed because they create a better, more seamless experience for viewers.
When you use the wrong specs, you risk awkward cropping, fuzzy video quality, and ultimately, less visibility. It tells the algorithm your content isn't optimized, and you'll likely see your views suffer for it.
The Rise of Vertical Video
Instagram has made it crystal clear where its priorities are: short-form, vertical video. This shift is backed by massive trends, with some projections showing that 82% of all internet traffic will be video by 2026. And within that trend, the 9:16 aspect ratio (1080 x 1920 pixels) has become the undisputed king, a format perfectly tailored for Instagram Reels. If you want to dive deeper into video trends, you can find more insights on heytrendy.app.
The move to vertical video simply follows user behavior. We all hold our phones vertically. Formats like Reels and Stories are designed to fill the entire screen, pulling viewers into an immersive experience that keeps them watching longer.
For any small business owner, this is a huge opportunity. A properly formatted vertical video can:
- Grab attention immediately: A full-screen video is way more compelling than a small square post swimming in a sea of white space.
- Work with the algorithm: Instagram wants to keep people on the app. Immersive, high-quality video is one of the best ways to do that.
- Make your workflow more efficient: When you film vertically from the start, you can create one primary video and easily repurpose it for both Reels and Stories, which saves a ton of time.
This quick reference chart breaks down the most important specs you need to know for each video placement.
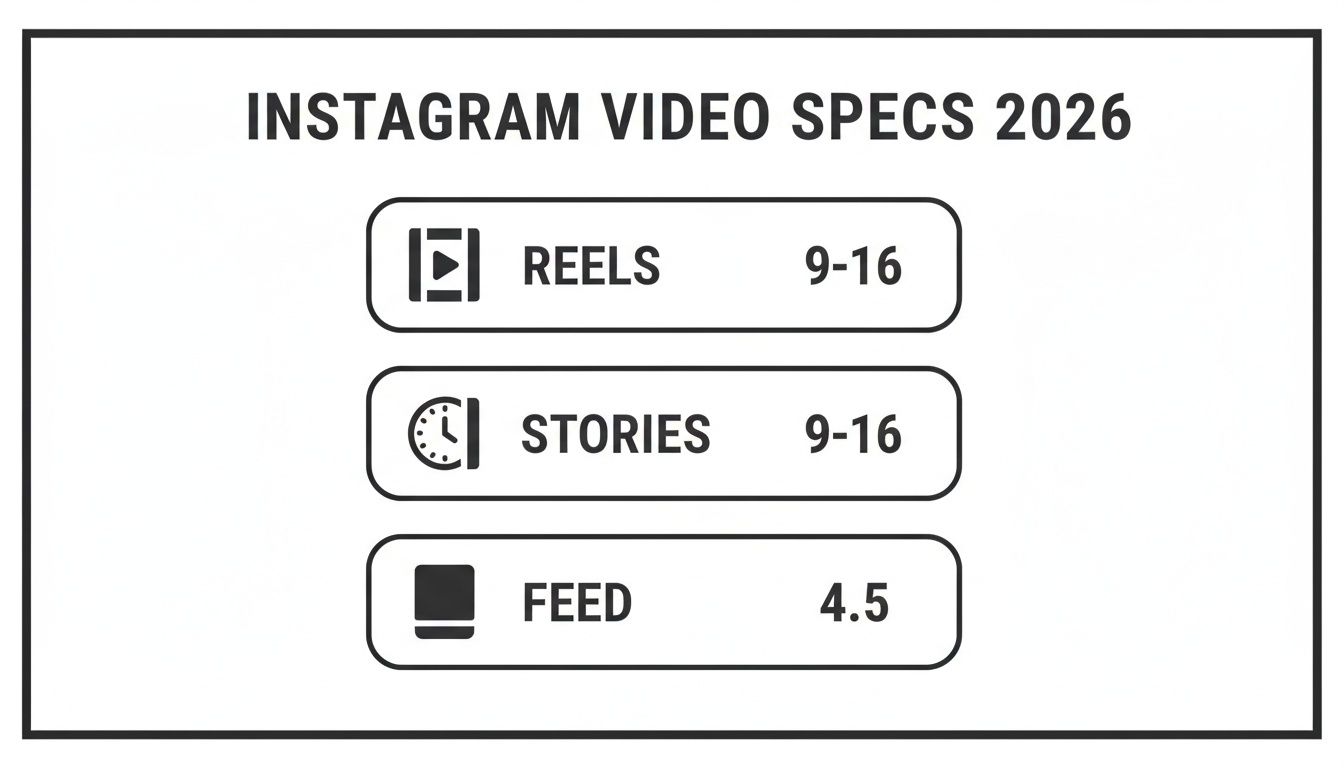
The main takeaway here is simple: focus on vertical. The 9:16 and 4:5 formats are what you need to master to get seen across Instagram’s most valuable video real estate.
To make it even easier, here is a quick-reference table summarizing the key specs for 2026.
Instagram Video Format Specifications for 2026
| Video Type | Aspect Ratio | Resolution (Pixels) | Max Duration |
|---|---|---|---|
| Reels | 9:16 | 1080 x 1920 | 90 seconds |
| Stories | 9:16 | 1080 x 1920 | 60 seconds |
| Feed Post (Rec) | 4:5 | 1080 x 1350 | 60 minutes |
| Feed Post (Alt) | 1:1 | 1080 x 1080 | 60 minutes |
| Instagram Video | 9:16 | 1080 x 1920 | 60 minutes |
Keep this table handy when you're exporting your next video. Matching these specs is the first step toward creating content that not only looks great but also gets the attention it deserves from the algorithm.
Mastering the Instagram Reels Format for Maximum Reach
If you want to grow on Instagram, you need to be using Reels. There’s really no way around it. The algorithm pushes Reels harder than any other format because their full-screen, immersive design is incredibly effective at keeping people on the app.
This means Reels give you a huge advantage in organic reach, often putting your videos in front of people who don't even follow you yet. The numbers don't lie: Reels now make up 46% of all time spent on Instagram and are shared over 4.5 billion times per day. For any small business, that’s a direct line to new customers. You can dig deeper into Instagram's growth trends over at vidpros.com.
Key Technical Specs for Reels
Getting your video specs right is the first step. If you stick to the proper instagram video format for Reels, you’ll avoid weird cropping, pixelation, or compression that makes your content look unprofessional and get ignored by the algorithm.
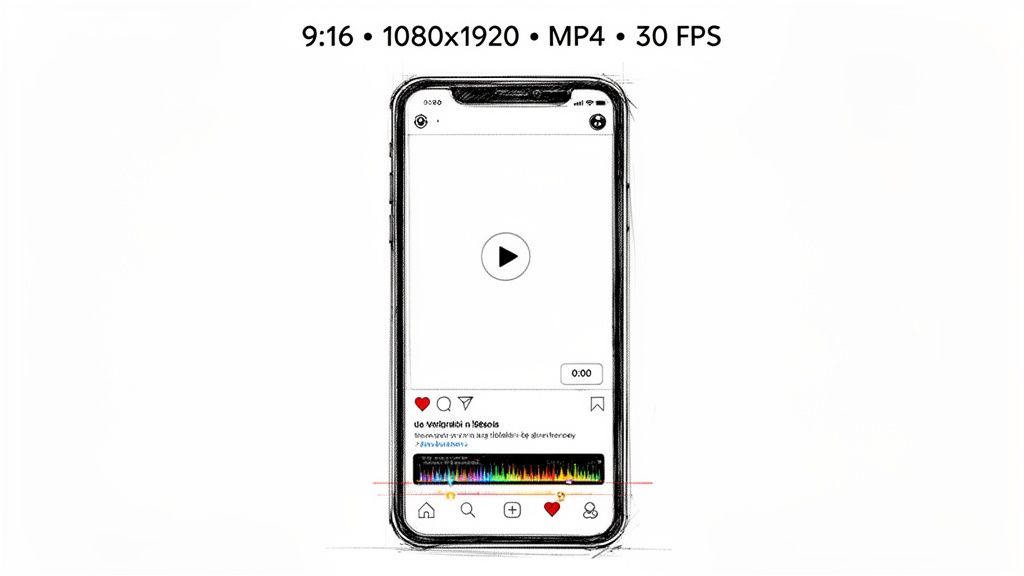
- Aspect Ratio: 9:16 – This is the standard vertical phone screen. No compromises here.
- Resolution: 1080 x 1920 pixels – Exporting at this size keeps your video sharp and clear on mobile.
- Frame Rate: 30 FPS (Frames Per Second) – This is what Instagram expects and what provides the smoothest playback.
- File Format: MP4 with an H.264 codec is your safest bet. It’s the universal standard for a reason: it works everywhere and balances quality with file size.
Practical Example: A local bakery films a quick behind-the-scenes video of a cake being decorated. By shooting vertically on their phone and exporting with these exact settings using an app like CapCut, they can turn a simple moment into a polished, high-performing Reel that pulls in new local followers. If you want to understand why these specs matter so much, our guide on the Instagram Reels algorithm breaks it all down.
A Simple Workflow for Creating Reels
Trying to stay consistent with Reels can feel like a full-time job, but it doesn't have to. The secret is batching your work.
Productivity Tip: Block out two hours on a Monday to film short clips for the entire week. For instance, a personal trainer could film five different exercise tutorials. By shooting it all at once, you build a library of content you can pull from all week, saving you time each day.
Once you have your clips, you can quickly add trending audio, captions, and text overlays right in the app. Using trending audio is especially important—Instagram’s algorithm often gives a boost to videos that use popular sounds.
Of course, nailing the technical format is just one piece of the puzzle. To really make Reels work for you, you need a strategy to get more eyes on your content. There are some excellent, data-driven playbooks that explain how to get Instagram views effectively. Combine the right specs with a smart workflow, and you'll be able to create Reels that consistently drive growth for your business.
Optimizing Your Instagram Stories for Engagement
Instagram Stories are your direct line for building real connections with the audience you already have. While they use the same 9:16 vertical format as Reels, their job is completely different. Stories aren’t really about discovery; they’re for nurturing your community with timely, interactive, and more personal content.
Unlike a Reel that stays on your profile grid, a Story vanishes after 24 hours. This creates a natural sense of urgency that encourages your followers to check in daily. It makes them the perfect spot for casual, in-the-moment updates.
Story Video Format and Technical Specs
To make sure your Stories look crisp and fill the screen properly, you’ll want to stick to these core specs. This is the ideal instagram video format for this placement:
- Aspect Ratio: 9:16. This is a full vertical screen.
- Resolution: 1080 x 1920 pixels.
- Video Duration: Up to 60 seconds for each Story slide. If you upload a longer video, Instagram will automatically chop it into 60-second clips for you.
- File Type: MP4 is your best bet. It’s the standard for a reason, offering a great balance between video quality and file size.
- File Size: Keep your individual video files under 4GB.
Nailing these specs means your video won't have any awkward black bars or blurry compression artifacts. It just creates a much cleaner viewing experience.
Productivity Tips for Effective Story Content
Posting daily Stories doesn’t have to be a grind. A smart workflow can help you stay consistent and save you a ton of time.
Productivity Tip: Try batching your content. Set aside one block of time each week to plan and create all your Story content at once. A coffee shop owner could film short clips of latte art, new pastries, and customer interactions, then save them all to a dedicated "Stories" folder on their phone. This way, they can just grab and upload pre-made content in a few minutes each day.
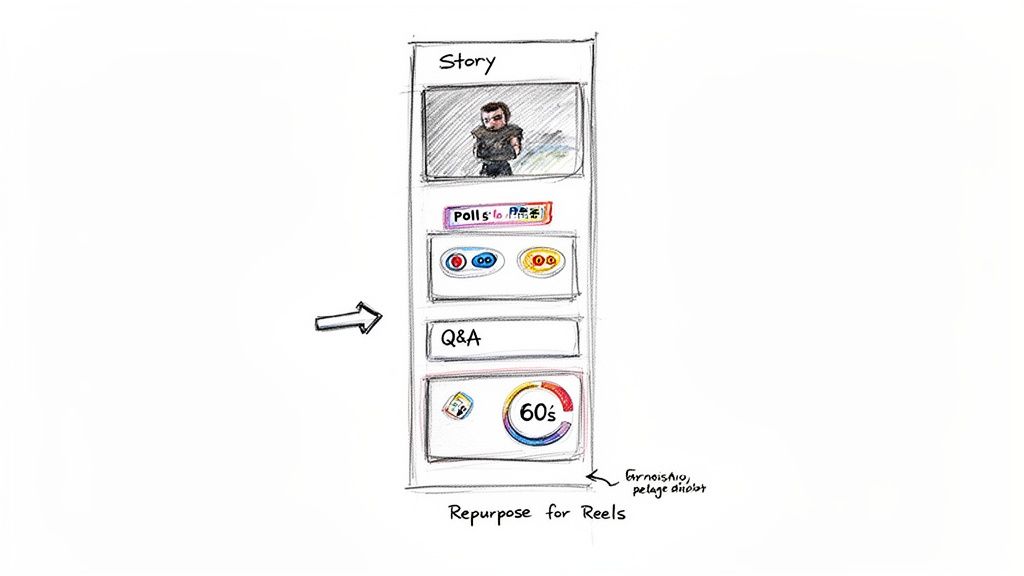
A great way to work smarter is to repurpose your content. A single vertical video can often pull double duty. Practical Example: Post a dynamic, 60-second clip as a Reel to maximize your reach, then share that same video to your Story. Once it's in your Story, you can add interactive elements like a "this or that" poll or a Q&A sticker to get a conversation started. If you want to see how this works in practice, our detailed guide can show you how to share a story on Instagram.
Use your Stories to run polls, ask questions, share content from your followers, or post behind-the-scenes moments. This interactive approach makes your audience feel included and heard, which goes a long way in strengthening their connection to your brand.
Understanding In-Feed and Long-Form Video Formats
Beyond the quick hits of Reels and Stories, Instagram gives you powerful ways to share more traditional video content right in the main feed. These formats are a go-to for creators and businesses who need a little more time to tell a story, demo a product, or share their expertise.
But there’s a critical detail you need to know about how Instagram handles these uploads. Since mid-2022, any video under 15 minutes that you post to your feed automatically gets published as a Reel. This is a huge advantage, as it gives your shorter videos the powerful algorithmic reach of Reels, helping you get in front of new audiences.
This shift means that for your true long-form content—videos running between 15 and 60 minutes—Instagram has a separate home. These longer videos live under the "Video" tab on your profile, building a library for your most in-depth content.
Optimizing Your In-Feed Video
While Instagram’s feed accepts different aspect ratios, they aren’t all equally effective. You can post a square (1:1) or even a horizontal (16:9) video, but for grabbing attention, vertical is king.
The best instagram video format for in-feed posts is 4:5, with a resolution of 1080 x 1350 pixels. This taller format simply takes up more screen real estate than a square post, making your video much more dominant as people scroll. That extra space helps your content stand out and encourages viewers to stop and watch.
Choosing between all the different video placements can get confusing. To really get it right, it's essential to understand the key differences in Instagram Reel vs Stories.
For the best possible quality, always export your video as an MP4 file using the H.264 codec and AAC audio. This combo is the industry standard and ensures your video looks crisp and plays perfectly on any device.
A Practical Guide: When to Use Each Format
Knowing when to post a short, Reel-style video versus a longer "Instagram Video" is a key part of an effective content strategy. Here are a few practical examples to help you decide.
- Short Feed Video (Under 15 Minutes): This is perfect for a 2-minute customer testimonial from a happy client, a 5-minute quick-tip tutorial on styling a scarf, or a 90-second product demo showing how your new gadget works. Because these are published as Reels, they tap into the discovery algorithm and have a better shot at reaching people who don't follow you yet.
- Long-Form Instagram Video (15-60 Minutes): Use this for a 20-minute webinar replay, a 30-minute interview with an industry expert, or an in-depth product walkthrough explaining every feature. This is the content that serves your dedicated followers—the ones who want more substantial value from you.
By using both short, reach-focused videos and longer, value-driven content, you can build a well-rounded Instagram presence that attracts new followers while nurturing your existing community.
Key Technical Specs for High-Quality Uploads
To avoid Instagram's notorious compression and keep your videos looking sharp, you need to nail the technical specs. While the platform technically accepts both MP4 and MOV files, think of MP4 as the universal key—it guarantees the best compatibility everywhere.
The file format is just the container. Inside, you have codecs that compress your video and audio. For video, Instagram wants the H.264 (AVC) codec. For audio, it's all about AAC (Advanced Audio Coding). Stick with this combination, and you’ll sidestep most quality and playback issues.
File Formats and Codecs Explained
Let's quickly break down these core settings. Getting this right during export is the single best way to make sure your video looks as good on Instagram as it did in your editing software.
- File Format (Container): MP4 is the undisputed champion. It gives you an excellent balance of high quality and small file size, making it perfect for streaming on the web and mobile.
- Video Codec: H.264 is the workhorse of video compression. It's incredibly efficient, delivering great-looking video without creating massive files that take forever to upload.
- Audio Codec: AAC is the standard for a reason. It produces clear, crisp sound at lower bitrates, pairing perfectly with H.264 video.
Practical Example: When you choose MP4 (H.264 + AAC) in your export settings in a program like Adobe Premiere Pro, you’re essentially giving Instagram exactly what it wants. This dramatically reduces the chances of the platform re-compressing your file and ruining its quality.
Bitrate and Frame Rate Settings
Beyond format and codecs, two other settings directly control how your final video looks and feels: bitrate and frame rate.
Bitrate is the amount of data used for each second of video, measured in kilobits per second (kbps). A higher bitrate equals more detail and better quality, but it also means a larger file. For most Instagram videos, a bitrate around 3,500 kbps is the sweet spot, giving you crisp visuals without a huge file.
Productivity Tip: In your video editor's export settings, create a preset with a constant bitrate (CBR) of 3,500 kbps. This gives you predictable quality and file sizes every time, taking the guesswork out of your workflow and saving you from adjusting settings on every export.
Frame rate, measured in frames per second (FPS), controls the smoothness of your video’s motion. Even if you film at 60 FPS for some slick slow-motion, Instagram plays everything back at 30 FPS. Exporting at 30 FPS ensures your video plays smoothly on the app, with no stuttering or dropped frames.
How to Export Perfect Videos for Instagram
Getting your export settings right is the final, and most critical, hurdle in your video workflow. This is where all the technical specs we've talked about come together into one perfect file. It's important to remember one thing: no matter how flawless your export, Instagram will always recompress your video.
Our job is to give its compression algorithm the best possible file to work with. Think of it as handing over a high-resolution master. The better the source, the less quality you’ll lose on the other side. This section will walk you through the practical export settings so you can create reusable presets that make every video look its absolute best, saving you a ton of time.
Export Settings for Popular Editing Tools
While the layout of every video editor is a little different, the core settings you need to adjust are always the same. Whether you’re working in a professional tool like Adobe Premiere Pro or a user-friendly app like CapCut, you’re looking for the controls for format, codec, resolution, and bitrate. Final Cut Pro also offers powerful, streamlined export options for creating high-quality files. Pricing: see website for details.
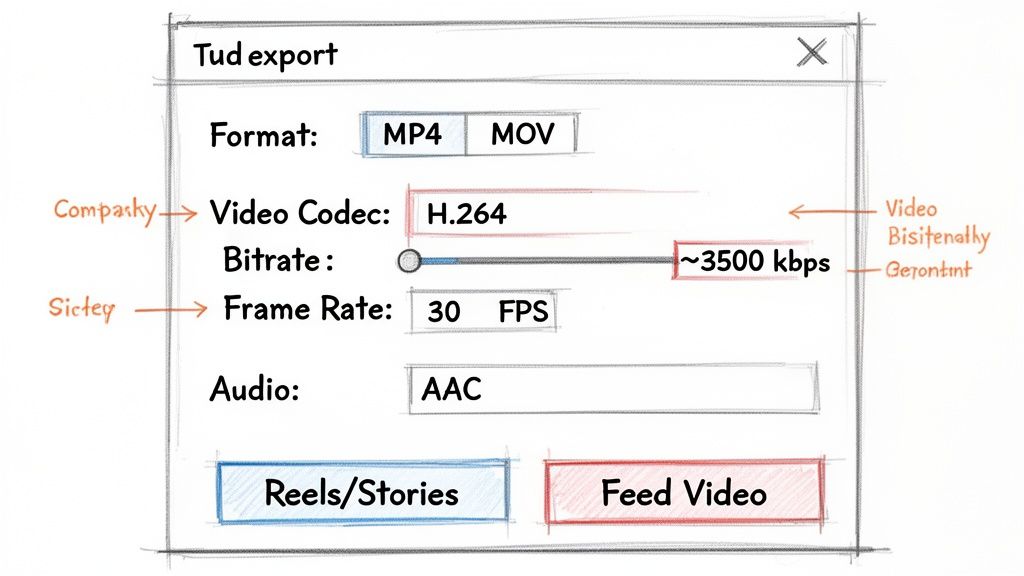
Let’s look at a common example using Adobe Premiere Pro’s export dialog.
You can see all the key parameters right here. The Format is set to H.264, and just below that, you’ll find the options for resolution, frame rate, and bitrate. This is exactly where you’ll plug in the recommended settings for the specific Instagram video format you're creating.
To really speed things up, you can create and save your own export presets. This is a massive productivity win. For instance, you could build two go-to presets that cover most of your needs:
- "Instagram Reel 9:16": Format: H.264, Resolution: 1080×1920, Frame Rate: 30 FPS, Bitrate: 3,500 kbps (CBR).
- "Instagram Feed 4:5": Format: H.264, Resolution: 1080×1350, Frame Rate: 30 FPS, Bitrate: 3,500 kbps (CBR).
Practical Examples and Tool-Specific Tips
Creating presets is the best way to guarantee consistency and quality every single time you export. Here are a few quick tips for some of the most popular editing tools out there.
Productivity Workflow: Create a dedicated "Instagram Exports" folder on your computer. Once a video is exported there, it’s ready to go. You can then use a scheduling tool to upload directly from your desktop, saving the hassle of transferring files to your phone. If you're looking for ways to streamline scheduling, check out our guide on how to post on Instagram from a desktop.
Here are some tips for specific editors:
- CapCut (Desktop/Mobile): This tool is incredibly popular for its simplicity and powerful features. When you export, just pick your resolution (1080p), frame rate (30 FPS), and choose the "Recommended" bitrate. CapCut makes it dead simple to get a high-quality MP4 file that’s ready for Instagram. Pricing: see website for details.
- Adobe Premiere Pro: This industry-standard editor provides granular control. Use the export window to set Format to H.264, then create and save a preset with the exact resolution, frame rate, and bitrate settings for Reels and Feed posts. Pricing: see website for details.
Your Instagram Video Workflow and Checklist
Staying on top of Instagram video can feel like a full-time job. The secret isn't to work harder, but to build a simple, repeatable system that takes the guesswork out of it.
I've found the most effective workflow is: Plan > Batch Create > Edit with Presets > Schedule > Analyze. This approach is all about creating content in focused sprints, which beats trying to make something from scratch every single day. It also ensures every video you post nails the correct instagram video format specs.
Your Step-by-Step Instagram Video Checklist
Use this guide for every video you make. It’s a simple reference that covers everything from planning to exporting, so you don't miss a beat.
Productivity Tip: Keep this checklist in a digital note-taking app like Notion or Google Keep. You can create a template and duplicate it for each new video project, ensuring you maintain quality and efficiency across all your content.
1. Pre-Production (The Plan)
- Pick Your Placement: First, decide where the video will live. Is it a Reel, a Story, or a post for your Feed? This single choice will determine all of your technical settings.
- Define Your Goal: What's the point of this video? Are you trying to drive sales, get more engagement, or just build some brand awareness? Know your goal before you hit record.
- Script or Outline: You don't need a Hollywood script, but jotting down a few key talking points or a rough shot list saves a ton of time during filming.
2. Production (The Shoot)
- Film Vertically: Always shoot for the format. That means 9:16 for Reels and Stories. You can then crop to 4:5 for the Feed if you need to.
- Check Light and Sound: Good lighting and clear audio are non-negotiable. Seriously. Just filming near a window or using a simple ring light makes a massive difference.
- Batch Your Clips: Film several clips in one go. This builds up a library of content you can pull from for the week or even the month ahead.
3. Post-Production (The Edit & Export)
- Edit for the Destination: Trim your video to the right length. For a Reel, that means keeping it under 90 seconds.
- Add Captions: A huge number of people watch videos with the sound off. Burned-in captions are a must for accessibility and keeping viewers hooked.
- Export with a Preset: This is where the magic happens. Use your pre-made export presets (MP4, H.264, AAC, 30 FPS, 3,500 kbps) to guarantee a perfect upload every time. No more guessing.
Your Instagram Video Questions, Answered
Getting video right on Instagram can feel like a moving target. The specs change, the algorithm shifts, and what worked yesterday might not work today. Here are quick, clear answers to the questions I hear most often, designed to help you stop troubleshooting and start creating.
What’s the Best Video Format for My Small Business?
Honestly, it all comes down to your goal. If you want to attract new customers and maximize your reach, Reels (9:16 aspect ratio) are non-negotiable. The algorithm loves them, and they are, without a doubt, your best bet for discovery.
For nurturing the audience you already have, Stories (also 9:16) are perfect. Think of them as your daily touchpoint for behind-the-scenes content and quick engagement. If you're sharing more detailed content like a product demo, a Feed Video (4:5 aspect ratio) is a great choice because it takes up more screen real estate than a standard square post.
My advice: If you're just starting with video, master one format first. Focus everything on Reels. Film vertically (9:16), and you'll have a single piece of content you can easily repurpose for both Reels and Stories, which is a huge time-saver.
Can I Post the Same Video to Reels, Stories, and My Feed?
Yes, but you’ll want to adapt it for each placement. A single 90-second vertical video can be a killer Reel. You can then share that exact video to your Stories, but keep in mind Instagram will automatically break it into 60-second chunks.
When it comes to your Feed, you could post that same 9:16 video, but it will show up with black borders. For a cleaner look, I always recommend creating a separate 4:5 version that fills the screen much more effectively.
Here’s a productive workflow:
- Shoot a 90-second vertical video for a Reel.
- Post it as a Reel for maximum reach.
- Share that Reel directly to your Story and add interactive stickers like a poll or Q&A.
- In your video editor, duplicate your 9:16 sequence, change the resolution to 1080×1350 (4:5), and adjust the framing. Export this version to post on your Feed for your current followers.
Why Does My Video Look So Blurry on Instagram?
Blurry video is almost always caused by one of two things: your export settings are off, or Instagram's aggressive compression is degrading the quality.
The fix is to always start with a high-quality source file. Think of it this way: you want to give Instagram’s compression algorithm the best possible file to work with, which minimizes the quality loss on their end. Export your video with these settings:
- Format: MP4
- Codec: H.264
- Resolution: 1080p (e.g., 1080×1920 for Reels)
- Frame Rate: 30 FPS
- Bitrate: Use a constant bitrate (CBR) around 3,500 kbps.
Also, a simple but often-overlooked tip: make sure you’re uploading on a strong, stable Wi-Fi connection. A poor connection can also cause a drop in quality.
At Postful, we’re building tools to make creating and scheduling your social media content feel effortless. Turn your work into more business with AI-powered post suggestions and simple multi-network scheduling. Join our free early access at postful.ai.